Learn to do collages with Photoshop
One of my passion for years, is to have fun on Photoshop. I started when I was 12 years old with my first laptop (using photo filtre at the time!). I learned everything on my own, by following tutorials on graphic design forums or YouTube videos. I’ve never followed any kind of trainings. For me, the best way to learn is to have a goal and do some researches to reach the desired outcome. It takes time at first: I used to spend entire nights to create things that I can do in 30 minutes now, but it’s also a good way to retain the information in our brain. When you look for something by yourself, you will grasp it better and above all remember it!
Maybe my techniques are not really “conventional”, indeed graphic design students might find my approaches a bit amateur, but that’s what I am: an amateur! I am not a professional graphic designer. So, don’t hesitate to tell me if I can improve my work.
Tips: all the adobe programme (Photoshop included) are up to 65% for all students and teachers with a one month free trial. It’s a good way to test it at minimal costs. 😊
Tools to master to make Photoshop collages
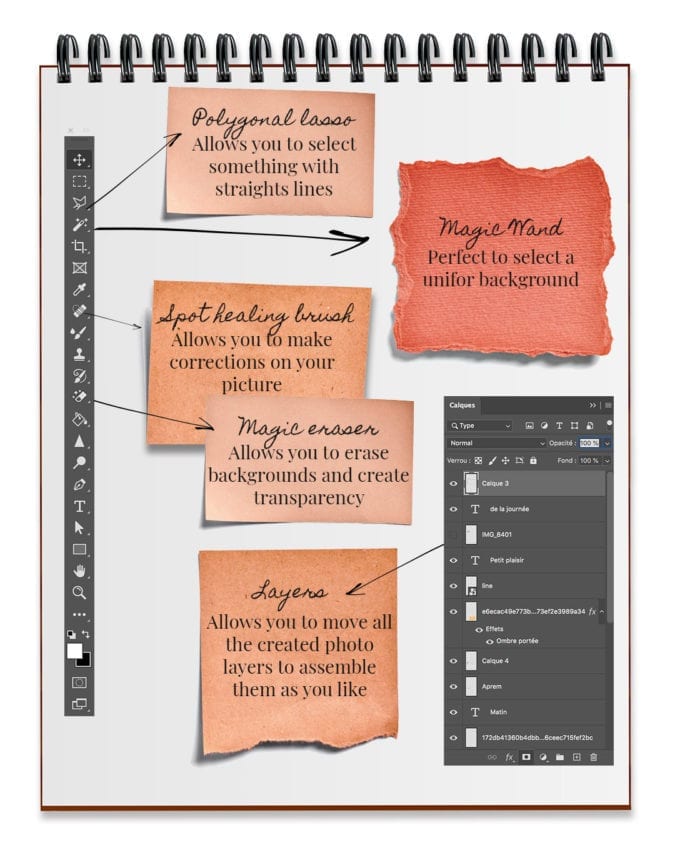
- Lassos: those tools offer you to make different types of selection in a picture. My favorite one is the polygonal lasso which allows you to select something with straight lines (easier to use than the lasso for which you need to make the selection directly with your mouse). The magnetic lasso is also great, it will automatically crop the object that you want to select. However, it is quite random.
- Magic wand: this tool is fantastic to select a uniform background.
- Spot healing brush: this tool will allow you to make corrections on your picture (remove dust, things that are bothering you, …). You could also do it with some other tools like the stamp one, but the spot healing brush is easier to use.
- Magic eraser: it’s the essential tool to do some collages. It will allow you to erase backgrounds and create transparency around the object you want to paste, and with only one click!
- Layers: it’s the critical part for photo assembling and collaging. It will allow you to move all the created photo layers to assemble them as you like.
Few concepts to understand before starting collages
You need to visualize your “digital” collage like if you were doing it in real life with layers of papers. If you had to do a collage “for real”: you would cut out the picture one by one, adjust them to your sheet, then you would paste them and draw on top. It’s the same mechanism with Photoshop: you will cut out your pictures, paste them on the background, and adjust them one by one in relation to one another!
There are different types of web formats: .jpeg, .png, .gif… Most of the pictures and the best quality for web extraction are .jpeg. But this format doesn’t take into account the transparency that can exist on photoshop. If you want to save your cut-out collage items you need to export them in .png. A heavy format for files, not so good for web extraction, but it will allow you to keep the transparency and you will be able to reuse the file in your future collages without having to cut it out again. Your final Photoshop collage should be exported in .jpeg.
Pay attention to the dimensions of your files. The bigger your files are, the greater the quality will be for your collage. If your file is too small, the collage will be pixelized when you will adapt it to your collage. Take only items that have the same scales (the digital scale is the pixels).
Time-saving keyboard shortcuts (on Mac)
- Copy: cmd + C
- Paste: cmd + V
- Change size/angle: cmd + T
- Undo last modification: cmd + Z
- Re-establish last cancelled command: cmd + shift + Z
- Reverse a selection: ctrl + I
Where to find resources for your Photoshop collages?
Over the years I build a huge stock of “resources” to do my collages. Most of the work consists in finding the items that will compose your photo. The more you will have in stock, the more ideas you will have for your collages. Small tip: save everything you see and sort them!
To help you build your first collage, I created a file with some resources that you will be able to use right away! It’s on the house! ❤️
- Pinterest (free): pay attention to quality, don’t download from Pinterest directly, always open the links.
- Adobe Stock (10 free images): THE free image of rights database. You need to pay a monthly subscription to use it (30 €, if I’m not mistaken). However, Adobe currently offers 10 free images.
- Forums: graphic design forums offer tons of super cool very useful resources for your collages.
- Google: as always, Google is your best friend.
- Pngtree: this website offers 2 free download a day. It’s not a lot, but by doing it on a regular basis, you will create yourself a nice stock.
Crop your images
There are several ways to delete the background of an image.
Cut out an image
Thanks to the lasso tools (I advise you to use the polygonal one), you will be able to crop the image that you want and isolate it from its background. If you make a mistake, press “delete” to come back to your selection. You need to join the two ends to validate the selection. As soon as it’s done, click on “selection” then “select and hide” to improve your selection. Like that you will be able to add or remove some areas. The most important aspect is to add a light gradual contour and to smooth your selection to make it less raw. Adjust depending on your item. Click on confirm, copy the selection ( shortcut “cmd + c”) and paste it on your background.
If you want to save the selection and create a png, go back on your image with the selection. Reverse the selection, either with “selection” then “switch”, or with the shortcut “cmd+i”. It will change your selection by selecting the rest of the image. Fill it with a color, either with the brush tool or with the shortcut “cmd+delete”. Then, use the magic eraser tool to delete the background and save your file in .png in the best quality available.
Delete the neutral background of an image
If your image is already on an isolated neutral background, you can simply delete it thank to the magic eraser by selecting it, then click on the color to delete it.
How to do Photoshop collages
- Open your background in Photoshop. Whether it’s a neutral one or a predefined background you chose.
- Open the files that will compose your collage in finder (if working on a Mac)
- You can directly from finder slide the elements on your neutral background (eg: white or colored background) or the .png files. Png files don’t need to be cut out as they already have a transparent background. If the file as a plain background, delete it with the magic eraser tool by clicking on it. Don’t forget the “internal” parts of the photo.
- Display the first items already by moving the layers to have the desired overlaps. E.g. if you want to do a “post-it” effect: first the post-it, then the tape on top. Adjust it by turning them etc… Until you get the desires outcome.
- You can adjust the size and the place of your images thanks to “edit”, “free transform” or the shortcut “cmd+T”. A square will appear around the selected element, there you can either expand the image by stretching the corners or change the angle by positioning your cursor on the corner (it will display a small arrow turning on itself, click on it and pivot your images as you like)
- For the elements that are not on a neutral background, open them in photoshop and cut them out thanks to the methodology explain above. Then, select the whole image and copy/paste it on your collage. Adjust it thanks to the “free transform” (cmd+T)
Extra tips to improve your collages
- You can add shadows to your items but it requires some skills. If you want to do it, right lick the layer, then select “blending options”, then “add shadow” and adjust it with the other shadows on your image.
- You can balance the color of your collage thanks to the “filters” tool, then “filter camera raw” and play with the different color items and exposure to make your collage more uniform.
- Play with blending options: no need to master them, for this kind of collage. In the end you just need to play a lot and test each of them and see if it fits with your image!